When engine power fails, it is required to execute a forced landing. While flying, always keep your eye out for a field.
Remember: #1 priority is to make the field.
1. Set BEST GLIDE speed (60 KIAS)
2. CARB heat on
- this will fix issues such
- 1. air intake blocked (because this is alternate air source)
- 2. carb icing
- 3. mixture gets richer
3. Find place to land
4. Determine key points (final, base which is 45 degrees from runway)
5. CAUSE check
6. CABIN Check and passenger briefing: ELT, Fire E., seatbelts, crash position, etc.
7. COMMUNICATIONS : Mayday - Transponder to 7700.
8. Shutdown check (as in POH: master off after flaps, mags off, doors unlatch, etc.)
Too low (less than 1000 AGL), turn early from key point
Too high (more than 1000 AGL), go past key point
Links: http://www.mpaviation.com/lessn17.htm
Tuesday, December 14, 2004
Friday, December 03, 2004
Precautionary Landing
Precautionary landing might be required due to weather conditions, mechanical issues – basically anything could be detrimental if you contine flying.
This type of landing could be done at familiar airports, unfamiliar airports and fields. In order to land the plane safely, you’ll need to do a COWLS check.
- C for Civilization (you would want to land somewhere you can get help)
- O for Obstructions
- W for Width
- L for Length
- S for Surface
For a COWLS check, you will need to do as many high and low passes on the area you intend to land. One high pass and one low pass is required as a minimum:
- Omit Low pass if icing or mechanical issues (because you’ll need to overshoot to get to circuit height before coming in for landing)
- Omit High pass if clouds or time is critical
1. You should always be prepared for a precautionary or forced landing by picking fields while flying. As soon as you are required to do a precautionary landing, pick a field of sufficient length.
2. Consider approach conditions, taking into consideration winds (usually same as winds from where you started, otherwise look for natural signs such as smoke, trees, etc.), map out the area and pick key points mentally (final, base, crosswind, downwind – taking into consideration winds which is likely same as winds when you started)
3. Secure cockpit, notify FSS and do downwind checks and give passenger briefing
4. Initiate a descent to height where you won't have any obstructions (usually 1000 AGL or 500 above circuit height if it is an airport)
5. High level inspection:
- Establish recommended air speed and flaps as outlined in POH (60 KIAS, 20 degree flap) as you enter base or upwind
- Enter circuit as you would at an uncontrolled airport
- Fly at circuit altitude using key points
- Check approach and departure end keeping ‘runway’ to your left
- Full power and retract flaps incrementally after upwind high level inspection, turn crosswind and then downwind
- look at the field for obstructions when flying downwind as well
- Downwind check
6. Low level inspection:
- Descend when turning base as a normal base leg
- - Establish recommended air speed and flaps as outlined in POH (60 KIAS, 20 degree flap) at base
- Level off as low as possible (500 ft. when practicing)
- Keep ‘runway’ to your left and give examiner a briefing
- Overshoot: full power, carb cold, flaps incremental
4. Final
- Turn crosswind and climb back to normal altitude
- do the 3 P check (Pan Pan, Passenger, Pre-Landing check)
- Turn base and final for landing (maintain normal approach speed)
- Touch down in the first third of the field
Wednesday, November 24, 2004
Diversion
Figure out where you are
Fly around the point (left turns if possible so that you can look out)
Circle point of start (circling) and point of destination
Draw straight line from start to destination
Estimate heading using VOR Compass Rose on map
Estimate distance (finger width is 5 KTS)
Estimate time (distance x 2/3)
Fuel Enough ? (6 gal./ hour)
Mark half way point
Set heading indicator while on level flight
Go to center of start point and turn to heading making note of time
Set Throttle at cruise
Call Flight service and let them know of diversion
Wednesday, November 10, 2004
Performance Landings
Performance Landings
During this time when the student is practicing solo takeoffs and landings, instructor time with the student is spent on teaching the student what is called performance takeoffs and landings: soft field, short field, soft/short field with obstacle:
Short Field
Leave power on for an extra 5-10 sec. when turing base to give yourself a higher approach
Put down full flaps either mid/turn-final
Aim at point slightly before target touchpoint (to allow for flare)
With full flap, speeds to be at 65 KIAS on final slowing to 55 KIAS over numbers at power to idle
Touchdown firmly and almost flat
On runway, apply max breaking and retract flaps to provide tire friction
Call out "simulated heavy braking" for simulation
Soft Field
Approach as in Short Field
Add touch of power to minimize rate of descent
Hold aileron off the runway for as long as possibe, so that it gently settles on main gear
Hold nosewheel off for as long as you can and let it settle to ground when you want to
Do NOT apply any brakes, let the plane slow down on its own
For training purposes, brake normally once excercise is complete
Short Field with Obstacle
Same as Short Field, except clear obstacle by at least 25 feet
Friday, November 05, 2004
Cross Wind Landings
There are many complex manoeuvres in flying - crosswind landings is one of them. Shifts in wind will challenge your ability to bring the plane to a smooth and centered touch down, something that is a matter of safety.
- Remember the cross wind limitation of the aircraft 1/4th of plane stall speed (13 KIAS for a Cessna 152 which has a stall speed of 52 KIAS)
- Remember rules of thumb for how much cross-wind to expect:
20 degrees off the runway – 25%
40 degrees off the runway – 50%
60 degrees off the runway – 75%
90 degrees off the runway – 100%
i.e. if it is 250/20 off runway 27, the wind is 20 degrees to the left of the runway, so the cross wind is 5 KTS.
- If the winds are gusting, approach at an increased speed of ½ the gust factor. i.e. if it is 20 gusting 30, and you would normally approach at 65 KTS, you would approach at 70 KTS (i.e. 30-20 / 2 + 65 KTS)
- Landing with flaps is more prone to being affected due to x-wind
- Crab into wind while approaching runway (the wing that is in the path of wind should be dropped slightly so that it doesn't behave as a sail)
- Correct longitudinal alignment with runway using rudder
- Crosswind correction should be done only when close to runway
- Do whatever it takes to align runway using rudder (floor rudder if required) and aileron
- Always maintain landing speed: 65 KIAS (flap), 70 KIAS (flapless)
- The wheel that is in the path of the wind should touch the runway first
- GO AROUND if REQUIRED
Thursday, November 04, 2004
Performance Takeoffs
Performance Takeoffs
During this time when the student is practicing solo takeoffs and landings, instructor time with the student is spent on teaching the student what is called performance takeoffs and landings: soft field, short field, soft/short field with obstacle:
Short Field Take-Off
Flaps 10 degrees
Request “backtrack with short delay”
Backtrack to end of runway and line up with centerline (ensuring that nosewheel is straight)
Apply full power against brakes and hold control column back (not too far back)
Release brakes and let aircraft lift off by itself
Level off in ground effect (1 wingspan max)
Accelerate to 55 KIAS and rotate out of ground effect to climbout at 68 KIAS
REMEMBER to RETRACT YOUR FLAPS at SAFE ALTITUDE
Soft Field Take Off
Flaps 10 degrees
Request “Take off on the roll”
Apply full back pressure and taxi onto runway using NO BRAKES
As you line up (making sure nosewheel is straight) apply full power
Let plane lift off on its own and remain in ground effect and rotate out at 55 KIAS climb out at 68 KIAS
REMEMBER to RETRACT YOUR FLAPS at SAFE ALTITUDE
Short Field with Obstacle take off
Flaps at 0 degrees
Request “backtrack with short delay
Backtrack and line up, making sure nosewheel is straight
Apply full power against the breaks (not holding control column back)
Release brakes and accelerate to 55 KIAS, rotate and climb out at 56 KIAS
When clear of Obstacle, transition to 68 KIAS climb speed
Monday, October 04, 2004
Circuit Procedures
Circuit Procedures
After completing solo for five hours within gliding distance of airport, doing landings and takeoffs ad nausea, these circuit procedures (including crosswind takeoffs and landings) becomes almost second nature. Below is my memory jog (i.e. things I used to foget) on basic takeoffs and landings:
Circuits Memory Jog for Sushee
Take off
Rotate at 55
Don’t be afraid to use RUDDER
Maintain climb out attitude and 70 KIAS
Crosswind Turn
Keep climb going
Gentle Turn
Remember to level off at circuit height (Attitude, Power, then Trim)
Don’t be afraid to use RUDDER
Downwind
Do anything that is necessary to maintain circuit height
Downwind check from memory
Base
Announce Intentions ("City Tower, this is GGNJ, touch-and-go runway 2-4")
Power, hold attitude for airspeed to decrease
Flaps (slow count till 7)
Establish and maintain 65 KIAS (20 degree flaps; 70 KIAS for 0 degree flaps, 60 KIAS for 40 degree flaps)
Final
Get runway between your legs
Crosswind input – Slight aileron as required and lots of RUDDER
Power = Altitude ; Pitch = Speed
Take power out completely before landing
Flare with Cruise Attitude and then Nose up
Overshoot
Power on full first then carb off
Positive rate of climb
Flaps up in increments ; hold nose for positive rate of climb
Saturday, September 04, 2004
Slow Flight, Stalls, Steep Turns:
The student is now ready to go solo to the practice area and practice slow flight, stalls, steep turns, etc. HASEL check should be done prior to these procedures.
HASEL Check
Height above 4000 ft.
Area not built up
Secure – doors/windows/seatbelts/objects
Engine – primer locked, master on, alternator on, mags both, unnecessary electrics off, oil pres./temp. green, carb hot, mixture rich, fuel on;
Lookout – 90 degree to left (look at heading indicator and stop at 90 <-) and 90 degree to right ->)
Flapless Stall Entry
Power to idle (control yaw with rudder)
Maintain Altitude by pulling back on control
Flap Stall Entry
Power to 1500 RPM
Flaps at 20 degrees, count till 7
Maintain Altitude by pulling back control
Stall Recovery:
Control – Nose down (no dives, to regain flight attitude at level, use rudder)
Power – Full Throttle, Carb Cold
Drag - Flaps UP
Spin Entry:
YAW in direction of wing drop in stall (fully stalled is prerequisite)
Only done in certified aircraft by instructor.
Spin Recovery:
In spin, the airspeed will be constant or low at stalling speed
Power OFF (Throttle to idle, carb cold, flaps off)
Control – Full opposite rudder, hold till rotation stops, control column forward (full forward might be required)
Power ON – Throttle Full, Carb Cold, Flaps off
Spiral Recovery:
In descent, airspeed, descent and wing load will be increasing
Power Off
First Neutralize Ailerons – roll wings to level
Then Pull out of dive.(otherwise it aggrevates spiral)
Apply power after airspeed down
Slow Flight Entry:
Pick a point on the nose (to try hold heading )
Reduce Power to 1500 RPM (or reduce RPM in 100 RPM stages)
Carb HOT
Trim to maintain altitude
Drop Flaps 20 degrees when airspeed in White Arc
Adjust Pitch
At desired A/S, adjust power (2000 – 2200 RPM Right Rudder) Altitude should not increase/decrease
Add power during turns
Add full power for climbs (not adjusting pitch)
Slow Flight Recovery:
Full power, right rudder, Carb COLD
Lower nose for A/S to increase
Flaps up in stages
Steep Turns:
Pick a point on the nose (so that you can come back to that point)
Note heading indicator
Make lookouts (left and right)
Roll through 30 degrees (wing strut parallel to ground)
Roll through to 45 degrees increasing power and pulling control column back
Keep horizon line on windshield constant
Don’t let altitude to drop
Roll back 20 degrees prior to start heading
Monday, July 26, 2004

Friday, July 23, 2004

Thursday, July 22, 2004

Wednesday, July 21, 2004
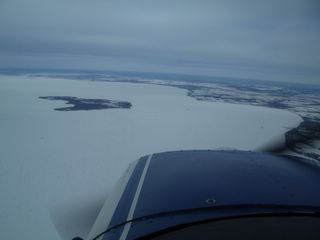
Picture: Thorah Island
Flight to CYPQ from CYTZ over Lake Simcoe during solo cross country - this is Thorah Island on Lake Simcoe


Tuesday, July 20, 2004


Subscribe to:
Comments (Atom)