VOR - Radio Navigation
If flying INBOUND towards becon - TO (and intercept radial at 90 degrees)
If flying OUTBOUND from becon - FROM (and intercept radial at 45 degres)
Reversing heading... take away 2 from 100th digit and add 2 from 10th digit
eg. 240... 060
Sunday, December 11, 2005
Commercial - Airwork
Spin entry isn't taught in Private, so this was new to me.
HASEL check
Throttle to idle
Pull back on control column and let airspeed bleed to stall
Just before stall, add some power while full left rudder
-- Aircraft enters Spin
Hold on to control column (otherwise it will enter steep turn)
Power to idle
Full opposite rudder
Neutralize control colum, bring up wing
Add power, pull back on control column
Unusual Att.
If speed dropping - full power IMMEDIATELY, push down on nose
If speed increasing - idle power IMMEDIATELY, roll wing to neutral and pull up agressively
Climb / Descent
Start to level off at 10% of VSI (eg. 500 ft./min to 2000 ft. start to level off at 1950 ft.)
Side Slip
Remember to bring power to idle
Sunday, August 21, 2005
Night Flying
Night rating is an add-on to the Private License. You need 5 hours night dual, 5 hours instrument dual and 5 hours solo. Currency requirements are 5 night landings and takeoffs in the past 6 months.
- know your lights and cockpit blindfolded
> taxi
> landing
> beacon
> strobe
> nav (memory aid: there is no red port left) / right is starboard, lights are blue blue
> - turn on landing during downwind check
> - turn off nav/strobe lights (can be distracting when landing)
> - turn off landing lights during climb check (engine, instruments, lights)
- ground seems higher than it actually is (rely on your instruments)
> look all over the airport to break tunnel vision
> look at runway rushing up / look down to the far end of runway
- when landing, you'll have a tendency to flare higher
- when on final, you seem faster than you actually are
- carry flashlight and a backup light
- rely on heading indicator to do circuits
> - 90/90/90 degrees (i.e. 260/170/080/260)
> - reset heading indicator every 15 min. (when straight and level / double check when you land)
- know light gun signals
> red and white lights: do not land for time being
> red flashing: continue circling / taxi out of runway in use
> red steady: do not land / stop taxi
> green flashing: return for landing / cleared to taxi
> green steady: cleared to land / cleared to takeoff
- know radio navigation
> VOR, ADF and DME
> know limitations (for ADF, you need to be close to the startion... 10 nm?)
> tune, identify and set bearing
- know to/from: always fly to the VOR heading
- if left/right, you need to turn left/right to intercept
> - each dot is 2 degrees, turn left/right to half of what it indicates to intercept
> varies as you get closer, don't chase the needle, small adjustments
> if it appears diagonal (i.e. 10'o clock to 3 o'clock as opposed to just left/right from 12'o clock), the heading you want to intercept is ahead of you (what if it is back?)
Landing (flaring)
Flaring (from my notes and the web)
- pitch airspeed; power to keep runway number same place in window
- somewhere on short final, loosen your hands and light touch on yoke
- ensure that you are not pushing nose up/down unncessarly
- break up tunnel vision by looking all over (intersections, side)
- then concentrate on final
- Look down to the far end of the runway after you flare
- SMALL corrections to FLARE
> BEST TIP of ALL TIME: slowly ease yoke back WHILE slowly easing the throttle back simutaniously
> see a very small amount of sink; look only for the sinking in distance view
> when you are sinking, add back pressure.
> If you are not sinking, or even rising, don't relax pressure, just hold steady to bleed airspeed
> As soon as you detect any sink, start adding back pressure until the sink stops
> if you are sinking fast. Put in just a touch of power to stop the sink
> think of yoke as string; you only pull and relax pressure / never push or the "string"
> visualize a window right at the end of the runway that you have to fly though at a specific airspeed
and altitude in a specific configuration.
> constantly changing dynamic with variables, airplane is talking to you and showing you where it IS and what it's doing as opposed to where you WANT IT TO BE and WHAT YOU WANT IT TO BE DOING!!!
> You know how the controls function. You know what will happen if you apply pressure to the controls
> constantly asking yourself.......is the airplane where I want it to be
> and if not what do I have to do to make it go there.....NOW!!!
> If the nose is in the wrong place...correct it! If you're too fast....slow it down
> if you're too high.....lose it........too low.....get it up a bit.
> Just put it through that window at the right place in the sky and at the right speed
> then concentrate on doing whatever it takes to assume a landing attitude.....then hold that attitude as the speed drops off......keep the damn thing straight....
Saturday, April 16, 2005
Flying in the Rain
Flew through the rain once, but never got any explicit training, so here's my research on the subject...
- Flying in the rain is perfectly safe, just make sure you have VFR conditions - visibility, cloud base is sufficently high to fly above MOCA
- Losing altitude - pitch for Vy. (expect downdraft: rain cools the air and cold air falls...)
- Open up the side window for a good reference to the ground
- Be on top of weather conditions at all time, call flight watch
- Make sure your lights are on
If it's getting bad enough on the windscreen that you can't see well in front, make shallow S-turns to get a good look ahead out the side windows. - You can hydroplane on the runway same as the roadway. Wet surfaces also take a longer braking distance
- Be sure to have heat or good airflow to avoid fogged windows.
- When you come in to land you seem to be lower to the ground than you really are.
- If it has just begun to rain, all oil/dirt will rise to the surface making it very easy to slide off
- Don't hit the brakes hard.
- Use carb heat, not only in the event of icing, but as an alternate air source, to prevent the injestion of water into the engine.
Sunday, March 13, 2005
Communications
Basically (a) who you are speaking to
(b) who you are
(c) intentions
(d) position (altitude and position relative to whereever)
Before taxi -
"City Ground, this is GGNJ with information xx"
"City Ground, GGNJ would like taxi instructions from main apron to active circuit to xx"
"GGNJ to hold short of x-x"
Ready for takeoff -
"City Tower, this is GGNJ ready for take off" and "request..." for performance takeoff
ATC:
"City Tower, this is GGNJ at Base - touch and go (or full-stop landing) at runway x-x"
Clear of zone-
"City Tower, this is GGNJ at the beaches at 2,400 ft. clear of zone"
UNICOM -
"Lindsay UNICOM, this is C-150 GGNJ, go ahead advisories"
"Lindsay Traffic, this is C-150 GGNJ five minues south-west of Lindsay at 2,400 ft. coming into zone for a touch and go"
"Lindsay Traffic, GGNJ up-wind and joining downwind for runway x-x"
"Lindsay Traffic, GGNJ on downwind"
"Lindsay Traffic, GGNJ on final"
"Lindsay Traffic, GGNJ clear of runway"
"Lindsay Traffic, GGNJ on-route to city center VFR at 2,400 ft."
"Lindsay Traffic, GGNJ clear of zone, on-route to city center VFR at 2,400 ft."
SWITCH to 126.7
MF
"Muskoka Radio, this is C-150 GGNJ, go ahead advisories"
"Muskoka Radio, this is C-150 GGNJ five minues south-west of Muskoka at 2,400 ft. coming into zone for a touch and go"
"MR, GGNJ up-wind and joining downwind for runway x-x"
"MR, GGNJ on downwind"
"MR, GGNJ on final"
"MR, GGNJ clear of runway"
Pearson
"Terminal C, this is C-150 GGNJ"
"Terminal C, GNJ at xx at 2,400 ft. would like flight following"
"Terminal C, GNJ is switching over to ottawa tower, thanks for flight following"
Mayday
> 125.1 frequency - 7700 transponder code
"mayday mayday mayday; this is C172 GGNJ with engine failure in Clarmont training sector Bravo 3 NM NE of Claremont with two soles on board; making emergency landing; plane is white with brown trim"
http://www.flywindsock.com/students/downloads/Radio%20Procedures_Nontowered.htm
http://www.flywindsock.com/students/downloads/Radio%20Procedures.htm
Saturday, February 12, 2005
Instrument Flying
Five hours of flying with reference to instruments is the minimum required for the Private Pilot Licence. This training is crucial because one might accidently fly into bad weather or clouds and have no outside visual cues to help fly the plane straight and level. The inner ear that provides a sense balance can also provide false cues which could cause you to accidently put the plane in a spiral dive. You are taught to ignore the body's sensations when you don't have the horizon as a visual flight reference.
Attitute + Power = Performance
- If you are straight and level on the ATTITUTE INDICATOR and your POWER is at cruise setting, you should be at a straight and level flight.
- Performance instruments are Air Speed Indicator, Altimeter, Vertical Speed Indicator, Turn and Balance Coordinator and Heading Indicator - these will be constant if Attitute and Power is controlled.
Tip: With reference to attitude indicator, concentrate on one thing at a time: 1. if height, concentrate on altitude indicator. 2. if heading, concentrate on heading indicator.
Failures
- If the vaccum system fails (you can tell by the suction gauge), use the turn and bank coordinator which is powered by electricity.
Rules of Thumb
- Taking away 100 RPM while maintaining airspeed = 100 Ft. drop
- Taking away 100 RPM while maintaining attitude = 5 KTS drop
Turning back 360 degrees
- Rate one turn is approximatly a 15 degree bank angle
- 15% of your airspeed should be your rate one turn (10% of airspeed + 7 KTS is rule of thumb)
- It takes 2 minutes to turn back 360 degrees ((3 degrees / second)
- check time, note heading, start turn, level out after two minutes.
- Use markings on Attitute indicator and Turn and Bank coordinator to help
Climbing
- Attitute - 10 degree marking
- Power
- Trim
Descending
- Power
- Attitude (slightly below horizon in attitute indicator)
- Trim
Turning
- No more than 15 degrees (rate one)
Aviate, Navigate, Communicate
- when flight into poor visibility
- make 360 degree rate one turn
- if not out of poor visibility, call FSS (126.7) (they might hand you off to Pearson)
- first and foremost: fly the plane; navigate as per instructions; then speak with FSS
Link 1
Link 2
Saturday, February 05, 2005
Lessons Learned
- Don't miss any item in checklist / walkaround - don't rush it
- Passenger Briefing
- Land with power completely off
- Cruise alt. minimum (3000 ft.) start at surface
- Cruise alt. is ASL
- K lighting - click 7 times / J lighting - click five times w/in 5 sec.
- Remember which runway you’ll be landing on and have a mental picture of base and final
- At final, you should be 750-1000 above circuit height (NEVER BE LOW ON APPROACH – correct immediately – nose down, full power)
- Crosswind input: ailerons into wind, as much rudder correction as required to keep center line (you’ll do this at the last 3 seconds before touch down)
- Keep pressure off nose wheel – keep aileron off the ground
- Precisely and diligently go through entire checklist (mixture rich)
- Notify FSS as soon as you know that are changes to ETA
- Throttle and carb control should be smooth (especially in winter to prevent shock cooling)
- Lock controls after parking
- Even when taxiing, you are still flying the plane – so wind inputs AT ALL TIMES
Transport Canada has strict standards and minimums for being pilot-in-command (i.e. responsible for the safety of people on-board, those on the ground and the plane). Responsibilities and safety considerations in flying are enormous and the need for high personal standards and requirements for diligence and precision can't be overstated. I spend a lot of time reading or thinking about something flying related: flight safety, manoeuvres, engines, airframes, weather systems, navigation, air spaces, air law, risk management, decision making, etc.
Tuesday, February 01, 2005
Things to Ask CFI about
Took 220 hour pilot up in C-150. Pilot had never set trim for an airspeed and used arms forward and back to judge sensitivity and accuracy of trim set to control airspeed. Pilot had never been taught the C-150 relationship of the trim best rate of climb speed to the trimmed level cruise speed. Pilot had never done trimmed 30 degree banks to show hands-off stability in such a bank. Pilot had never been shown the 1 to 1 relationship a C-150 has between a full turn of trim and every 10 degrees of flap at approach power (1500 rpm). Pilot had never been shown that C-150 can be landed with power remaining at 1500 through touchdown. A potentially good pilot doing all the work and not using the engineered aircraft properties to make things easier.
Friday, January 28, 2005
Cross Country Notes
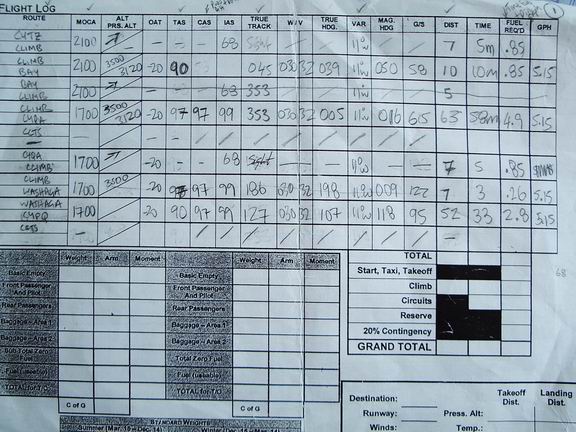
This is a compilation of learnings from the Toronto – Muskoka – Peterborough dual cross country trip that will be used as a memory jog for my first solo cross country and future cross country trips.
Cross country planning and preparation for your first time takes at least a couple of hours.Refer to pictures for the prepared map, flight log calculations, flight plan and weight & balance. Cross Country prepartion can be grouped into “day before” and “day of”. To summarize, on the day prior to the actual cross country, one would want to prepare the map (start, destination, way points, heading, distances, flight plan to file with Nav Canada) and on the day of, complete the flight planning with weather data (heading taking upper winds into consideration, ground speed, times to way points and destination points, pressure altitude, etc.), weight and balance and file the flight plan.
Day Before:
- Maps
- ensure that VNA/VTC maps are current (link in maps section of AIP) - POH
– ensure that it is in the plane - CFS
– ensure that you have a current CFS - Weather
– get idea of what the weather is going to be like the next day (a) on
route and (b) at destination - NOTAMs
Map Preparation
- Select
heading point (three ways – on route climb, geographic, overhead) –
geographic is preferred - Draw
lines from heading point to destination, taking into consideration terrain
features, civilization, airports on the way. - Draw
10 degree drift lines - Mark
half way points - Mark
10 mile marks - Pick
way points that are easily recognizable (and mark distance for that leg
and distance remaining)
Flight Log
- Write Routes For each leg of the route indicate:
- MOCAs
- Altitude
- True
Air Speed (from range profile from POH – based on power setting and
altitude you want to fly at – speed vs. fuel consumption) - true
track (based on center of the line from heading point to destination) - altitude
i.
above 3000 ft, fly even (if westerly) or odd (if
easterly) altitudes plus 500
ii.
base westerly or easterly on true track plus (if west)
or minus (if east) variation
- variation
- distance
- In the Enroute Observations, indicate
- Checkpoint
- Distance
- Distance
remaining
Weight and Balance
Complete all values except for landing weights (takeoff and zero fuel)
Airports procedures and airspace
Mark sections in CFS that are pertinent and review runway
configuration, MF and UNICOM procedures.
Flight Plan
With the exception of two fields (time of departure and total estimated time), the entire Canadian Flight Plan can be completed the day prior. Here are key fields and definitions:
Field 8: Flight Rules – V for VFR, Type of Flight: G for General Aviation
Field 9: Wake Turbulence category: L for light
Field 10: Equipment: VO for VOR and C for Transponder Mode C (enter VO / C)
Field 15: Cruising speed: N00XX (speed in xx), Altitude A00XX (altitude in xx’thou)
Route: D-> (for direct) “/” for stopover (and in the other information enter how long you would stopover)
Field 19: Endurance: 0530 hours from endurance profile in the POH (based on the lowest power setting. Emergency Radio: VHF and for ELT A,F) No survival equipment
Day Of:
- Call
flight service for weather briefing: 1866WXBRIEF and tell them route and
ask them for weather package - Complete
rest of flight log – for each leg: - Outside
Air Temperature (from upper winds) - W /
V (wind direction and intensity based on upper winds) - Pressure
Altitude (based on 29.92 minus altimeter pressure from METAR times 100) - Calibrated
Air Speed (from setting pressure and density on Flight Computer and
reading calibrated air speed from true air speed) - Indicated
Air Speed (from Airspeed Calibration section in the POH) - True
Heading (based on Flight Computer: (a) mark wind direction and intensity,
(b) slide to heading and set wind direction mark to true air speed, get Ground Speed from computer and determine True Heading based
on offset) - Determine
Magnetic Heading from adding (if westerly) or removing (if easterly)
variation from True Heading - Determine
Time and Distance based on Ground Speed from flight computer - Determine
Gallons Per Hour based on
Cruise Performance section of POH for the pressure altitude, power
setting and temperature - For
legs that involve climbing, look up Time, Fuel and Distance to Climb
section of the POH - Add
Distances, Times and Fuel Required. - For
Circuits, estimate based on 6 minutes at 6 GPH.(10 circuits an hour) - Indicate
Reserve based on Cruise Performance section (eg.
45% power, 3.7 GPH, so 30 minutes reserve is 1.8 Gallons.) - Indicate
20% contingency (by adding all fuel required and getting 20% of that value) - Calculate
take off distance, landing distances required for the temperature,
pressure altitude, wind) and check NOTAMS - Copy
all this data to the back of the flight Log - Finish
Weight and Balance and Flight Plan (departure time and estimated time to be
back) - Check
weather again for any changes - Ensure
plane is ready to go - File
Flight plan with 1866WXBRIEF - Organize
cockpit and GO!!
During Cross Country:
The cockpit workload when on the actual cross country for the first time is high, I suspect that it won’t seem overwhelming after you’ve done it a couple of times.
Go to set heading point
Execute SHITTTEE check
- Set
Heading Indicator (ensure you are not descending, ascending or turning) - Note
Time over set heading point - Turn
towards heading and fly (ensure heading makes sense) - Lean
mixture for peak RPM (not 50 less than because in case you forget to rich
mixture before you descend) - Set Carb heat at cardinal points
- Set
frequency and announce your intentions when entering control zones
When at Check Point
- Note
time over waypoint - Note
elapsed time (from last heading/way point) - Align
distance on the outside and time on the inside wheel of the flight
computer and write down Ground Speed - Note
estimated time to next leg and estimated time to destination in the RETA
column for the checkpoint (Note distance to next leg in the flight
computer and add the corresponding time to time over; do the same for time
to distance remaining)
Position Report:
At intervals you think it is necessary (not required for VFR flights, but this information will assist search and rescue if needed), provide VFR position report 126.7 Mhz: London Radio, London Radio, London Radio, this is XXXX over XXXX, time over XXXX, altitude XXXX, VFR
Flight Plan to destination XXXX.
Off Track:
When you are off track (based on visual), correct immediately. Using the double track
correction method:
- Revise
heading (eg. If you were off track by 5 degrees
- based on approximation with the the 10 degree
drift lines - to the port/starboard, the revised heading is 10 degrees
minus/plus heading you had intended to fly) - Fly
the heading for the amount of time you were on track last (i.e. if you
were at your checkpoint 15 minutes ago, you would fly the revised heading
for 15 minutes) - After
flying for the intended time, alter heading that is half plus/minus your
original heading (i.e. if you were originally off track by 5 degrees,
add/subtract 5 degrees to the original heading based on port/starboard
deviation)
Destination:
- Know altitude of aerodrome, circuit altitude, orientation of runways, wind
(based on departure) which will give an indication of the active runway - At time and position advised in the CFS, call UNICOM / MF to report position,
time, altitude, intentions. - For UNICOM, announce five minutes prior (“Peterborough Traffic, this is”)
- Say London Radio if MF is managed by London Radio and report call sign, wait
for response then report rest… - Plan your arrival path – Plan your descent (based on 500 ft. / min and 3500
feet, 3 minutes – at 80 ground speed this is 4 miles (using flight
computer), so start your descent accordingly - Plan your circuit joining - Overhead and join mid-downwind.
- For MF, announce when on Final
- For UNICOM, announce when overhead, announce when mid-downwind, announce when on final and announce when clear of runway
Departure:
- For UNICOM, announce “Peterborough UNICOM, this is XXXX Radio Check” and then
report intentions to “Peterborough Traffic, this is XXXX going to the
active runway for straight out departure to CYTZ” - Report when airborne “Peterborough Traffic, this is XXXX airborne and on route to
destination…” - Report when out of zone “Peterborough Traffic, this is at XXX Ft., clear of zone
and on route to destination…” - You might then have to set frequency and call air traffic control. Eg. Call
Thursday, January 27, 2005

Pilot Training Record cross country stamps and W and B
For an explaination, please refer to Cross Country Notes
Pilot Training Record cross country stamps

Weight and Balance calculations

Flight Plan filed with Nav Canada for Cross Country

Pilot Training Record cross country stamps

Weight and Balance calculations

Flight Plan filed with Nav Canada for Cross Country


Subscribe to:
Comments (Atom)